Activity 2. Keypad 4x4 and LCD 16x2
In this activity the Arduino Uno reads a keypad. The key pressed appears on a liquid crystal display. (50 minutes)
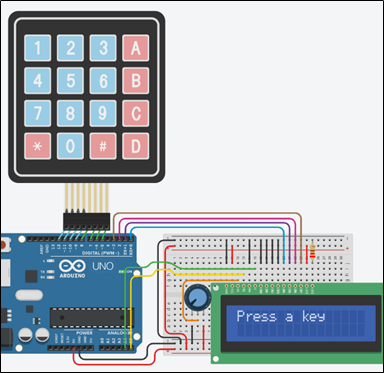
Activity 2
Step 1. Draw the circuit in Tinkercad.
Step 2. Study the code and write it on the microcontroller:
/* Keypad and LCD
Circuit Connections: **LCD Ground => Gnd
Power => Vcc
Contrast => Potentiometer
RS => PIN_A5
RW => Gnd
E => PIN_A4
DB0 => Gnd
DB1 => Gnd
DB2 => Gnd
DB3 => Gnd
DB4 => PIN_2
DB5 => PIN_3
DB6 => PIN_4
DB7 => PIN_5
LED Anode => Vcc
LED Cathode => Resistor 220Ω => Gnd**Potentiometer1 Terminal 1 => Gnd Wiper => LCD_Contrast Terminal 2 => Vcc **Keypad PIN_5 => Column4 PIN_6 => Column3 PIN_7 => Column2 PIN_8 => Column1 PIN_9 => Row4 PIN_10 => Row3 PIN_11 => Row2 PIN_12 => Row1 */
//include the library #include <LiquidCrystal.h> #define RS A5 //give the name "RS" to PIN_A5 #define EN A4 //give the name "EN" to PIN_A4 #define DB4 0 //give the name "DB4" to PIN_0 #define DB5 1 //give the name "DB5" to PIN_1 #define DB6 2 //give the name "DB6" to PIN_2 #define DB7 3 //give the name "DB7" to PIN_3
//configure the library with Arduino Uno - LCD interface LiquidCrystal lcd(RS, EN, DB4, DB5, DB6, DB7);
//inlcude the library
#include <Keypad.h>
const byte cols = 4; //four columns
const byte rows = 4; //four rows
//keypad output
char keys[rows][cols] = {
  {'1','2','3','A'},
  {'4','5','6','B'},
  {'7','8','9','C'},
  {'*','0','#','D'}
};

//configure the Arduino Uno - Keypad interface
byte row_pins[] = {12,11,10,9}; //pins connect to the rows
byte col_pins[] = {8, 7, 6, 5}; //pins connect to the columns
Keypad keypad = Keypad(makeKeymap(keys), row_pins, col_pins, rows, cols);

//variable to save keypad's charachters
char key;

//The setup() function initializes and sets the initial values
//It will only run once after each power up or reset
void setup(){
//configure the LCD's columns and rows
lcd.begin(16, 2);
//print a message
lcd.print("Press a key");
}
//loops consecutively
void loop(){
//wait until a key is pressed
key=keypad.waitForKey();
//clear the LCD and print the key
lcd.clear();
lcd.print(key);
}
Step
3. Run
the simulation and check the correct operation of the circuit
Step 4. Suggested modifications and discussion:
- Modify the code appropriately so that the keys give other characters. Specifically, the phrase "Hello, world!" can be written from the keyboard.
Tip1. Modify the table: keys[rows][cols]
Tip2. The requested phrase could be derived
from the keys:
1-2-3-3-4-Α-5-6-4-7-3-9-Β